

By : Magda Usarek-Witek, RYT
When looking into the New Year a lot of us think about a “new me” or a new beginning. How can we start this new beginning? Try starting with some detoxification techniques and allow all that old energy and toxins to leave the body. Give your mind and body a chance to press the “restart” button. Many yoga poses provide aide in digestion, higher metabolism, and open energy flow within the body; which helps calm down the nervous system and detoxify the organs. The most powerful source that we do have is oxygen. Oxygen, meaning breath, gives us energy, life, vitality. Did you know that during a normal inhalation an average person takes in 500 cubic centimeters of air and that during a deep inhalation almost up to 3000 cubic centimeters? That’s almost 6 times greater! We don’t want to go around all day taking up the maximum capacity of oxygen our bodies can take in because we might have a system overload if that happens. But, imagine if we just took a little more time to increase the flow of oxygen into our system. A lot of change can happen just from a minor modification to our daily routine.
In order for us to understand how pranayama (breathing exercises) contribute to our bodies, we should get at least a simple idea of how the respiratory system functions. The human body needs energy through oxygen and glucose. “Oxygen aids in the process of elimination by oxidizing waste matter, while glucose supplied with oxygen nourishes the body cells in the flow of respiration” (Light on Pranayama, B.K.S. Iyengar). The process of breathing and digestion helps detoxify the body, making sure that toxins do not build up and spread illness within the body. During the span of our life, our bodies self-regulate the depth and speed of the breath to allow fresh oxygen to energize the cells in our body and discharge carbon dioxide.
Most of us assume that because we breathe regularly, we don’t have any control over our breath. With the practice of pranayama, we can learn that we very much do have the capacity to change the depth and rate of the breath. These changes can promote calmness, ease, digestion, detox etc.
If you are interested, try a deep breathing exercise before you start your physical practice:
Dirga Pranayama – Three Part Breathing
This breath is considered a “complete breath” as the body takes in the maximum amount of oxygen. The breath is continuous and starts in the lower belly then moves into the lower chest and into the lower throat.
1. Start by lying down on the floor (on the back). Place a blanket under the head if the chin is higher than the forehead.
2. Place your right hand on your belly and your left hand on your chest.
3. Begin to breathe naturally, just observing the pattern of your natural breath. Become aware of the rise and fall of the breath. Become aware of how your organs move in relation to your breath.
4. Once accustomed to the natural rhythm of your breath, begin to inhale slowly into the belly to expand the spaces in between the fingers of the right hand.
5. After one breath, try expanding the second inhale to the belly and then the ribcage (lower chest).
6. After the second breath, begin to expand into the belly/right hand, to the ribcage/lower chest and all the way up to the top of the chest or the lower throat, into the left hand.
7. As you breathe out, let the breath release first from the left hand, then the ribcage, then the right hand.
8. Continue the three part breath for 7 to 10 full cycles.
9. Return to the normal breath before coming up to sit.
5 poses for Detoxing
Marichyasana I ~ Seated Spinal Twist

Benefits: Stimulates circulation, tone, and function of internal organs, especially liver, lungs, and spleen. Releases deeply held tension in the back neck and shoulders. Assists the elimination of toxins stored in the muscle and organ tissue ( Yoga Mind Body & Spirit, Donna Farhi).
1. Sit on your sit bones and take your legs out long. Sit on the edge of a blanket if necessary.
2. Bend your right knee and step the right foot over the left thigh. Keep the left foot flexed so the toes face the ceiling.
3. Wrap your left arm around your right leg and lift the right arm up to the ceiling.
3. Keep the spine long and tall. Breathe in and expand the breath into your organs in the abdomen. As you exhale start to twist to the right only reaching as far as the abdomen can twist.
4. Place your right hand behind your back in line with your sacrum and tent the fingertips. As you continue the breath, expand the chest and move the twist into the upper spine.
5. If there isn’t strain on the neck let the head follow the right shoulder, otherwise keep it in a comfortable position.
6. Stay for 6 to 10 breaths. Take a counter stretch to the other side and repeat steps on the left side.
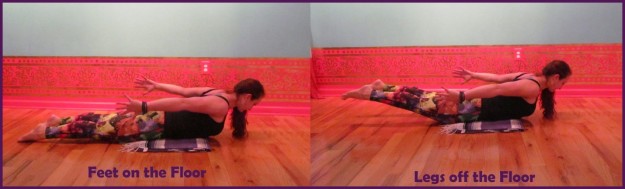
Salabhasana ~ Locust Pose
You’ll need: a blanket.
Benefits: Strengthens back muscles and reduces kyphosis (excess curvature of the thoracic spine). Improves erect carriage of the body. Stimulates the sex glands and reduces gas in the lower abdomen (Yoga Mind Body & Spirit, Donna Farhi).
***If you are pregnant, do not practice this pose.***
1. Lie belly down on a mat, placing a blanket under the hips for extra cushioning. Place your arms by your sides with your palms facing your thighs. Your legs are long, toes untucked so the tops of the feet are pressing into the mat.
2. Breathe in and imagine the belly rising bringing oxygen to the internal organs and the digestive track. On the next exhale slowly lift the belly, chest, shoulders head, and arms.
3. Reach your hands back to your feet. Keep the head in a neutral position by slightly tucking the chin into the chest and feeling the back of the head rise up to an imaginary pillow.
4. Continue to press the tops of the feet into the ground as your take three breaths in and out. Raise yourself a little higher on each inhalation. On each exhale, connect the belly and the internal organs to the spine, maintaining strength in the abdomen to protect the lower back.
5. Feel the connection all the way from the tailbone to the crown on the head. Feeling the whole body shape into the pose.
6. If you would like to deepen the back bend. On the next round repeat steps 1-5, then lift up the legs by engaging the back of the thighs and glutes. Feel the toes move to the back wall. If you feel any pain the lower, you have moved past your maximum capacity for today. Lower the legs until you feel space in the lower back. Stay for 3 to 5 breaths. Repeat 3 times.
Balasana ~ Child’s Pose variation with knees together

You’ll need: one or two blankets, maybe one block.
There are many variation of child’s pose. If you just did Locust pose, try keeping your knees together for this variation to support the spine.
Benefits: Good counter pose after a backbend. Releases hips, lower back, while arms, head, and neck rest. Alleviates gas and bloating. ( Yoga Mind Body & Spirit, Donna Farhi).
1. If you have sensitive knees, place a blanket in the middle of your mat come to sit on your shins with your knees together.
2. Fold the torso over your thighs and bring the forehead to the ground. If it cannot reach the ground, try placing a block under your head.
3. Let your arms rest by your feet. If your hips cannot reach your heels, or if your knees are uncomfortable, consider placing a blanket between the back of your thigh and the top of the calves.
4. Stay for 5-10 full breaths. Breathe into the ribcage, allowing the muscles in the back to expand. exhale and soften the hips and thighs.
Viparita Karani ~ Legs-up-the-Wall


You’ll need: one or two blankets
Benefits: Reduces water retention in ankles and legs, flushes the legs of lactic acid and build up. Good for post athletic activity and after long standing. Also balances neuroendocrine system and facilitates deep breathing. ( Yoga Mind Body & Spirit, Donna Farhi).
1. Take a blanket fold in half once and then again so it’s shaped like a small rectangle or square.
2. Sit next to a wall kneeling, with one side of the hips and thighs parallel with the wall.
3. Begin to roll down on your back and extend the legs up the wall.
4. Try to get your sit bone as close to the wall as possible. Use your hands and elbows to help you scooch forward into your seat.
5. For a moment, press the feet into the wall and lift the hips, place the folded blanket under your sacrum (the base of the spine) and rest the legs against the wall. Bend the knees a little if you need to reduce tension in the hamstrings.
6. Let your arms rest by your side and elevate your forehead above your chin with a blanket if needed. Stay for 5 to ten minutes. Close your eyes and allow the tension to release from the body.
7. To get out of the pose, press the feet into the wall, lift the hips to take a away the blanket from underneath the back. Then draw the knees into the chest, stretch the arms overhead and roll over onto your side. Use your hands to lift you into you seat.
Jathara parivartanasana ~ Spinal Twist on the floor
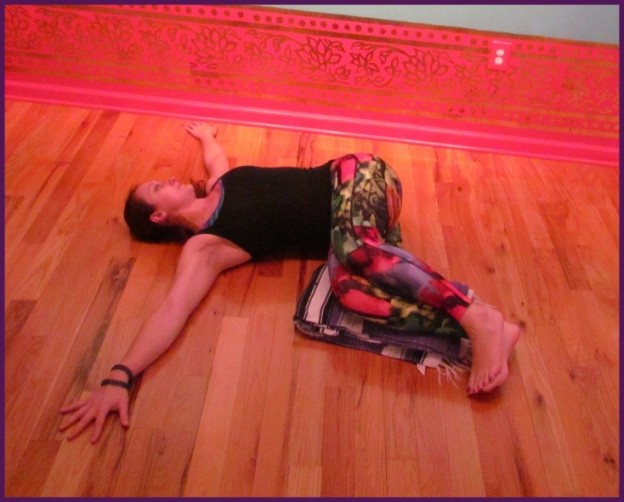
Benefits: Tones and stimulates the large intestine, improves elimination. Releases tension in spinal column, hips, and shoulders, Relieves minor aches, and discomfort in lumbar spine after long sitting, forward bending, or back bending ( Yoga Mind Body & Spirit, Donna Farhi).
**Do not do this pose if you have had a hip replacement or dislocated hips.**
1. Lie down on your back and bend your knees. Spread your arms out long; your hands should be aligned with your shoulders and palms down.
2. Press your feet into the ground and lift your hips up slightly. Shift the hips a few inches to the right and place them on the ground, lift the knees into the chest and let the knees fall over to the left. If your knees cannot reach the ground, place a blanket under them for support.
3. The head can either face the ceiling or look to the right (be comfortable in whichever variation you choose). Press the shoulders into the floor and let the chest expand on the inhale. On the exhale close the eyes and let the body move naturally in the twist.
4. Stay for 5 to 10 breaths and switch to the opposite side (hips to the left and knees to the right).
Magda teaches at Yoga in the Heights on Saturdays 12:30pm Yoga Basics. Register for her class here!
